
AspEmail.NET Manual Chapter 3: Secure Mail
Contents
3.1 Cryptography: a Primer
This section explains in layman's terms four key concepts modern cryptography is based on: one-way hash functions, symmetric encryption, asymmetric encryption, and digital certificates. If you are already familiar with these concepts you may skip directly to the next section.
3.1.1 One-way Hash Functions
A one-way hash function is an algorithm that takes a variable-length input and produces a fixed-length output, and this conversion process cannot be reversed (hence the name "one-way".) The most common hash algorithm in use today, SHA, produces 160-bit (20-byte) hash values.
A cryptographically secure one-way hash function must exhibit the following properties:
- The computation of the hash value is strictly one-way, i.e. it is practically impossible to come up with a document that produces the given hash value;
- It must be practically impossible to find two different documents that produce the same hash value;
- An even slight change in the document causes its hash value to change drastically.
Very few algorithms have been invented that meet these tough requirements. In addition to the already mentioned SHA, the other widely used algorithm is MD5 producing 128-bit hash values. There is also a modification to SHA that produces 256-bit values. This algorithm is commonly referred to as SHA256.
One-way hash functions are used extensively in cryptographic applications and secure protocols. For example, in a challenge/response authentication scheme, the client sends its username to the server but not the password. The server generates a random number and sends it back to the client. The client appends his password to the random number, computes the hash function of the combination, and sends the hash value back to the server. The server computes its own version of the hash from the random number and the client's password it keeps on file. If the hash values match, the client is authenticated. Thanks to the hash function, the client's password never has to be transmitted over the network.
Hash functions are also used in key generation, message authentication code (MAC) and, most importantly, digital signatures. Without exaggeration, the one-way hash function is the workhorse of modern cryptography.
3.1.2 Symmetric Encryption
Encryption is a process in which the text to be encrypted (usually referred to as plaintext) is combined with a long secret number (a key) to produce a seemingly random and meaningless sequence of bits (ciphertext.) The algorithm describing this process is called a cipher.
During decryption, the ciphertext is combined with the same secret key to produce the original plaintext (hence the name "symmetric".) Without the correct key, the original text cannot practically be recovered.
In modern cryptography, the key length is at least 128-bit long, but can be as long as 256 bits or even longer.
All symmetric ciphers fall into two categories: block ciphers and stream ciphers.
Block ciphers operate on short blocks of plaintext (usually 64-bit long) individually, one block at a time. The examples of block ciphers are RC2 (usually 128-bit keys), Triple-DES (always 168-bit keys) and AES (usually 256-bit or longer keys.)
Stream ciphers operate on one bit of plaintext at a time. The plaintext bits are XORed with the output of a keystream generator which produces a stream of bits based on a seed value. This seed value is the key for a stream cipher. An example of a stream cipher is RC4 (usually 128-bit keys.)
3.1.3 Asymmetric Encryption
Asymmetric cryptography (also known as public-key cryptography) is a remarkable invention. Without it, modern secure communications would simply not exist.
Using symmetric encryption alone, two parties, let's call them Alice and Bob, can exchange messages securely, but they have to agree on a key. To do that, Alice and Bob have to meet in person to prevent their key from being intercepted.
How can any two parties agree on a key without meeting in person? Enter asymmetric encryption.
Under this system, there are two keys involved instead of one - public and private. If the data is encrypted with the public key, it can only be decrypted with the corresponding private key, and vice versa (hence the name "asymmetric".) The private key is kept secret by its owner, while the public key is made available to anyone. By far the most popular public-key cipher is RSA.
RSA public and private keys are mathematically related, but one cannot practically be deduced from the other. Conceptually, the private key is a pair of large prime numbers. The corresponding public key is the product of these two large prime numbers. The security of RSA keys is based on the difficulty to factor large composite numbers.
With the help of RSA, the problem of exchanging keys securely can now be solved easily. Alice makes her public key available to Bob. Bob generates a random symmetric key, encrypts it with Alice's public key and sends it to Alice. Even if this message is intercepted, it cannot be read, since no one but Alice has the correct private key to decrypt it with. Alice decrypts the symmetric key with her private key. Now both parties have agreed on a key and can start exchanging messages securely using symmetric encryption.
While encryption with a public key facilitates secure key exchange, encryption with the private key helps create digital signatures.
For example, Alice produces an electronic document which she wants digitally signed to protect it from being altered and prove its authenticity. She computes the one-way hash function of the document and encrypts the hash value with her private key. The resultant ciphertext becomes this document's digital signature. Anyone who has access to Alice's public key can now decrypt the signature using her public key, compute the hash value of the document and compare the two hash values. If the values match, the signature is validated, i.e. it is proven that the document has not been altered since being signed, and it was indeed Alice who signed it.
Public-key encryption is very slow. Therefore, it is only used to encrypt short data (such as a symmetric key in the first example and hash value in the second.)
3.1.4 Digital Certificates
The two examples in the previous sub-section involved Alice's public key. But how can Bob (or anyone else) know that the public key he has obtained really belongs to Alice and not someone else? The short answer is: he can't. Enter digital certificates.
A certificate is a data package that contains the entity's details (such as its name, email address, organization, etc.) bundled with this entity's public key and is issued (and digitally signed) by an independent trusted third party called a Certification Authority (CA) only after that authority has verified its identity. An entity can be a private individual or organization. A certificate is essentially a vehicle for transporting public keys in a uniform and verifiable fashion.
We deal with digital certificates on a regular basis without even noticing it. Every time we purchase something online with a credit card, the information we submit is protected by Secure Socket Layer (SSL), a protocol based on public-key cryptography. The public key used by your browser to communicate securely with the web server is provided by the server via an SSL certificate. Its details can be viewed by clicking on the little lock icon displayed by the browser every time it operates under SSL.
A certificate can be issued to an individual as well. Personal certificates are often referred to as digital IDs. A basic digital ID suitable for sending and receiving secure email usually only contains the person's email address. Certificates like that are usually free. Other more advanced certificates suitable for legal digital signatures and electronic identification require a much more rigid verification procedure. One needs to pay an issuance and renewal fees to obtain a certificate like that.
The certificate enrollment procedure consists of the following steps:
- A public/private "key pair" is generated on the machine on which the certificate is to be installed (it could be a web server for an SSL certificate, or a workstation for a personal digital ID.)
- The public key is bundled together with the entity's identifying information (the company name and web address for an SSL certificate, the person's name, email address, etc. for a personal digital ID.)
- The bundle is digitally signed with the key pair's private key to form a temper-proof document called "certificate request file" (CRF).
- The CRF is then sent to a certificate authority (CA) of the requestor's choice such as Verisign, Thawte or any other.
- The CA verifies the information contained in the CRF and issues the certificate to the requestor.
- The certificate is installed on the machine, thereby concluding the enrollment process.
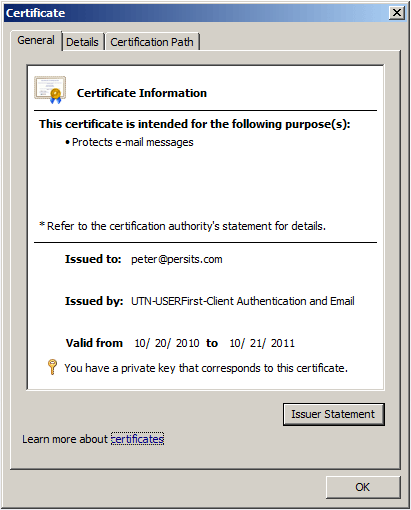
You can view the certificates installed on your machine by going to IE's Tools/Options menu, opening the Content tab and clicking on the Certificates button. Note that the certificates issued to you are marked with a small key icon captioned "You have a private key that corresponds to this certificate" while all other certificates are not marked that way as they belong to other entities and only their public keys are available to you.
Certificates are described in detail in the AspEncrypt user manual here.
3.2 Certificate Management in .NET
3.2.1 Get Your Own Certificate!
To experiment with AspEmail.NET's secure mail functionality, you will need your own personal certificate (digital ID.) You can obtain one from any certification authority you like. We recommend getting a free secure email certificate from InstantSSL by COMODO.
3.2.2 X509Certificate2 Object
.NET 2.0+ offers the X509Certificate2 class which represents a digital certificate. X509Certificate2 resides in the System.Security.Cryptography.X509Certificates namespace. AspEmail.NET's secure mail functions expect objects of this class as arguments to send signed and/or encrypted mail.
The easiest way to create an instance of the X509Certificate2 class is by passing the path to a certificate file to the X509Certificate2 constructor. There are several file formats a certificate can reside in.
When you export your own personal certificate from the Certificates dialog in IE, you are asked if you want to export the private key with the certificate. If you answer "No", a file with the extension .cer is created. This file is 100% public information: it contains your certificate (i.e. public key bundled with your identifying information) but not your private key.
A .cer file can be used to send encrypted mail to the owner of the certificate, but it cannot be used to send signed mail (as the latter requires the sender's private key.)
The following code snippet creates an instance of the X509Certificate2 class representing a .cer file:
...
X509Certificate2 objCert =
new X509Certificate2(@"c:\path\cert.cer");
...
Dim objCert As X509Certificate2 = _
New X509Certificate2("c:\path\cert.cer")
(A certificate can also be created from an array of bytes as opposed to disk file by passing the array as the argument to the X509Certificate2 constructor. This is useful, for example, when the certificates are stored in the database as blobs.)
If you select "Yes" when asked if you want to export the private key, you will then be asked to specify and confirm a password and the certificate will be saved in the Personal Information Exchange (PFX) format also known as PKCS#12. PFX files store certificates together with their private keys and usually have the extension .pfx or .p12. Private key information in such files is protected with a password.
To open a .pfx file, you need to pass the path to the file along with the password to the X509Certificate2 constructor, as follows:
new X509Certificate2(@"c:\path\cert.pfx", "password");
New X509Certificate2("c:\path\cert.pfx", "password")
A .pfx file should be used to send digitally signed mail as it contains the sender's private key.
Important: In an ASP.NET environment, executing the code above may generate the following error:
To avoid the error, you need to execute the script in the security context of an interactive user (such as yourself). In ASP.NET, the easiest way to impersonate a user is to use the <identity> tag in your Web.config file, as follows:
<system.web>
<identity impersonate="true" userName="username" password="password" />
</system.web>
...
</configuration>
3.2.3 Certificate Stores
Certificates on your machine are kept in certificate stores in the system registry. There are four stores of interest: personal (My), other people (AddressBook), intermediate CA (CertificateAuthority) and root CA (Root). The certificate stores are created for each interactive user as well as the local machine as a whole.
A certificate can be obtained from a certificate store directly, without exporting it to disk first. The following code snippet obtains a certificate with the given email address from the My store of the current user:
StoreName.My, StoreLocation.CurrentUser);
objStore.Open(OpenFlags.ReadOnly);
X509Certificate2Collection objCerts =
objStore.Certificates.Find(
X509FindType.FindBySubjectName,
"name@domain.com", true);
X509Certificate2 objCert = certs[0];
New X509Store(StoreName.My, _
StoreLocation.CurrentUser)
objStore.Open(OpenFlags.ReadOnly)
Dim objCerts As X509Certificate2Collection = _
objStore.Certificates.Find(_
X509FindType.FindBySubjectDistinguishedName, _
"name@domain.com", True)
Dim objCert As X509Certificate2 = objCerts(0)
3.3 AspEmail.NET's Secure Mail Functionality
AspEmail.NET is capable of sending encrypted email, digitally signed email, and email that is first signed and then encrypted. The messages are sent in certificate-based S/MIME format. Unlike AspEmail (which needs AspEncrypt to send secure mail), AspEmail.NET does not require any additional components. It is completely self-sufficient.
AspEmail.NET's secure mail functionality is a premium feature.
3.3.1 Encrypted Email
To send encrypted email, AspEmail.NET needs to have access to the recipient's certificate. The message-sending code is exactly the same as with regular mail except that the SendEncrypted method is called instead of Send. The SendEncrypted method accepts a single argument, an instance of the X509Certificate2 object containing the public key of the recipient.
When the encrypted message is received by the intended recipient, its S/MIME-enabled mail reader such as Outlook, Outlook Express, Mozilla Thunderbird, Windows Live Mail, etc. will automatically decrypt the message with the user's private key and display it.
Run the following script to send an encrypted message to yourself using your own .cer file. Before running this script, please modify it to specify your own location of the .cer file, if necessary.
MailSender objMail = new MailSender();
// Set SMTP server address
objMail.Host = txtHost.Text;
// Set Username/Password if specified
if (txtUsername.Text.Length > 0)
{
objMail.Username = txtUsername.Text;
objMail.Password = txtPassword.Text;
}
// Enable TLS if so requested
if (chkTls.Checked)
{
objMail.TLS = true;
}
// Sender's address
objMail.From = txtFrom.Text;
// Recipient's address
objMail.AddAddress(txtTo.Text);
// Subject
objMail.Subject = "Encrypted message";
// Body
objMail.Body = "This is an encrypted message";
// Open recipient certificate
X509Certificate2 objCert = new X509Certificate2(@"c:\mycert.cer");
// Send encrypted message
objMail.SendEncrypted(objCert);
Dim objMail As MailSender = New MailSender()
' Set SMTP server address
objMail.Host = txtHost.Text
' Set Username/Password if specified
If txtUsername.Text.Length > 0 Then
objMail.Username = txtUsername.Text
objMail.Password = txtPassword.Text
End If
' Enable TLS if so requested
If chkTls.Checked Then
objMail.TLS = True
End If
' Sender's address
objMail.From = txtFrom.Text
' Recipient's address
objMail.AddAddress(txtTo.Text)
' Subject
objMail.Subject = "Encrypted message"
' Body
objMail.Body = "This is an encrypted message"
' Open recipient certificate
Dim objCert As X509Certificate2 = _
New X509Certificate2("c:\mycert.cer")
' Send encrypted message
objMail.SendEncrypted(objCert)
Click the links below to run this code sample:

The email address of the recipient can be extracted from the certificate itself using the following code:
string strEmail =
objCert.GetNameInfo(X509NameType.EmailName, false);
objMail.AddAddress( strEmail );
...
Dim strEmail As String = _
objCert.GetNameInfo(X509NameType.EmailName, False)
objMail.AddAddress( strEmail )
...
3.3.2 Encryption with Multiple Certificates
In the previous example, the message is encrypted with a single certificate loaded from a .cer file. It is also possible to encrypt a message with multiple certificates at the same time. Any corresponding private key can be used to decrypt such a message. This is useful if the same encrypted message needs to be sent to a group of recipients (each using his or her own individual certificate.)
To send a message encrypted with multiple certificates, an overloaded version of the SendEncrypted message should be used. This overloaded method takes an instance of the X509Certificate2Collection object as the argument instead of a X509Certificate2 object. The certificate collection needs to be populated with one or multiple certificate objects, as follows:
new X509Certificate2Collection();
objCerts.Add( objCert1 );
objCerts.Add( objCert2 );
...
objMail.SendEncrypted( objCerts );
New X509Certificate2Collection()
objCerts.Add( objCert1 )
objCerts.Add( objCert2 )
...
objMail.SendEncrypted( objCerts )
3.3.3 Signed Email
To send signed email, the SendSigned method should be called. This method accepts a single argument, an instance of the X509Certificate2 object representing the signer certificate. This certificate must have a private key associated with it. Therefore, you cannot use a certificate loaded from a .cer file with the SendSigned method. You can, however, use a certificate loaded from a .pfx file.
The following code sample sends email signed with our test certificate signercert.pfx. Only a relevant code snippet is shown here for the sake of brevity. Remember to add the <identity> tag to your Web.config file as shown in Section 3.2.2 above to avoid an "internal" error.
// Open signer certificate. You may need to use impersonation
// to avoid an "internal" error.
X509Certificate2 objCert =
new X509Certificate2(Server.MapPath("signercert.pfx"),
"test" );
// Send signed message
objMail.SendSigned(objCert);
Dim objCert As X509Certificate2 = _
New X509Certificate2(Server.MapPath("signercert.pfx"),_
"test" )
' Send signed message
objMail.SendSigned(objCert)
Click the links below to run this code sample:
3.3.4 Signed & Encrypted Email
AspEmail.NET can also send messages that are first signed and then encrypted. To send messages like that, use the method SendSignedAndEncrypted which expects two arguments: the signer certificate and recipient certificate. There is also an overloaded version of this method which expects a certificate collection as the 2nd argument instead of a single certificate.
The following code sample demonstrates the usage of the SendSignedAndEncrypted method. As before, modify this script to point to your own .cer file, if necessary, and add the <identity> tag to your Web.config file to avoid an "internal" error.
// use impersonation to avoid an "internal" error.
X509Certificate2 objSignerCert =
new X509Certificate2(Server.MapPath("signercert.pfx"),
"test" );
// Open recipient certificate
X509Certificate2 objRecipientCert =
new X509Certificate2(@"c:\mycert.cer");
// Send signed & encrypted message
objMail.SendSignedAndEncrypted(objSignerCert, objRecipientCert);
' use impersonation to avoid an "internal" error.
Dim objSignerCert As X509Certificate2 = _
New X509Certificate2(Server.MapPath("signercert.pfx"),_
"test" )
' Open recipient certificate
Dim objRecipientCert As X509Certificate2 = _
New X509Certificate2("c:\mycert.cer")
' Send signed & encrypted message
objMail.SendSignedAndEncrypted(objSignerCert, objRecipientCert)
Click the links below to run this code sample:
3.4 DKIM
DomainKeys Identified Mail, or DKIM, is a method by which the sender of email digitally signs the message to prove it really came from the domain that is claims it came from. Please refer to Section 5.5 of the AspEmail user manual for the detailed description of DKIM and how to set it up so that you can start sending email with DKIM signatures.
As of Version 5.3, AspEmail.NET is capable of sending DKIM-equipped messages via the method SendCertified. This method expects 4 arguments: the signer certificate, domain, selector and option flags.
- The signer certificate argument is an instance of .NET's X509Certificate2 object. It can be obtained either from a .pfx file or directly from a certificate store. See Section 3.2 of this chapter for more information on the use of certificates for signing.
- The domain and selector arguments are two strings specifying the domain and selector (such as "mycompany.com" and "hq".) The message recipient uses this information to obtain the public key for signature verification from the domain's DNS records. Note that the domain argument must match the domain of the email address specified via the Mail.From property.
- The option flags argument is a collection of flags and should normally be 0. Currently, only two flags are defined. Bit 1, if set, prevents the Date header from being included in the signature, bit 2, if set, prevents the Message-ID header from being included in the signature. As of Version 5.6.0.5319, Bits 3, 4 and 5 prevent the custom headers List-Unsubscribe, List-Unsubscribe-Post, and Feedback-ID, respectively, from being included in the signature.
The integrity of a DKIM signature relies on the message headers and body being in a standard (or "canonicalized") form. To ensure the body is properly formatted, you must set the property ContentTransferEncoding to "Quoted-Printable" before calling SendCertified. If necessary, also use the method EncodeHeader for the headers such as Subject and others.
The following code sample sends a DKIM-signed message:
objMail.Host = "myhost";
objMail.From = "info@mycompany.com";
objMail.AddAddress("someone@anothercompany.com");
objMail.Subject = "DKIM Message";
objMail.Body = "Message body";
objMail.ContentTransferEncoding = "Quoted-Printable";
// Open signer certificate. You may need to
// use impersonation to avoid an "internal" error.
X509Certificate2 objCert =
new X509Certificate2(Server.MapPath("cert.pfx"),
"test" );
// Send DKIM-signed message
objMail.SendCertified(objCert, "mycompany.com", "hq", 0);
objMail.Host = "myhost"
objMail.From = "info@mycompany.com"
objMail.AddAddress("someone@anothercompany.com")
objMail.Subject = "DKIM Message"
objMail.Body = "Message body"
objMail.ContentTransferEncoding = "Quoted-Printable"
' Open signer certificate. You may need to
' use impersonation to avoid an "internal" error.
Dim objCert As X509Certificate2 = _
New X509Certificate2(Server.MapPath("cert.pfx"),_
"test" )
' Send DKIM-signed message
objMail.SendCertified(objCert, "mycompany.com", "hq", 0)
AspEmail.NET's DKIM functionality is a premium feature.
3.5 Google GMAIL & Office365 oAuth
3.5.1 What is oAuth?
OAuth is an open-standard authorization protocol that describes how unrelated servers and services can safely allow authenticated access to their assets without actually sharing the account password. A typical example of oAuth at work is when you are asked to login to a web site using your Google or Facebook account to share your profile name and picture.
Update: As of Version 5.6.0.5338, AspEmail.NET's oAuth supports has been extended to Microsoft Office365. For more information on the use of AspEmail.NET with Office365, see Section 3.5.4 below.
In the context of AspEmail.NET and a third-party mail provider such as Google GMAIL, oAuth provides a mechanism for AspEmail.NET to send email on behalf of a GMAIL user without specifying the GMAIL account password in the script. Instead, an access token obtained from Google is specified via the Password property, and the token value must be prepended with the string "[oauth]" (this prefix is case-insensitive), as follows:
objMail.TLS = true;
objMail.Username = "myaccount@gmail.com";
objMail.Password = "[oauth]ya29.Il-8B-88nf.......GhoNhUXKtBS-ZEQOAZ9tTWg";
...
objMail.Send();
If you are using message queuing with EmailAgent.NET (described in Chapter 4), the access token needs to be put in the password boxes of the EmailAgent.NET Configuration Panel on both the SMTP and POP3 tabs.
As of February 2020, it is still possible to use AspEmail.NET to send email via Google's smtp.gmail.com server the old-fashioned way, by specifying the Google account's username and password in your script. The Google account needs to have the "Allow less secure apps" option enabled for this to work.
However, Google has clearly signaled its intention to disallow "less secure" applications (that is, those not using oAuth) to access its mail server. In response to that, we have added oAuth support to AspEmail.NET 5.5.0.4826, and provided a way to obtain access tokens from Google both interactively and programmatically.
3.5.2 How to connect to GMAIL via oAuth?
The first step is allow AspEmail.NET access to your GMAIL account by going to the the followig URL:
If you have multiple Google accounts, you will be asked to pick one and sign in. Ignore the This app isn't verified warning.
You will be presented with the following dialog:
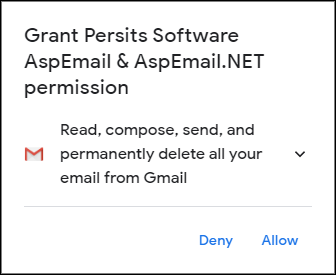
When you click Allow, you will be asked to confirm your choice, and after that, you will be given a code that looks something like this:
This authorization code needs to be exchanged for the actual access token. The exchange can be performed both interactively and programmatically.
IMPORTANT: An authorization token can only be used once. After it has been exchanged for the access token, it cannot be used again.
To obtain your access token interactively, go to https://www.aspemail.com/oauth.aspx.
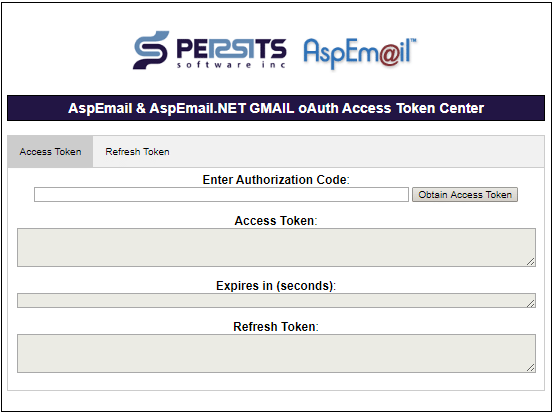
There are two tabs, Access Token and Refresh Token. On the Access Token tab, you can exchange your authorization code for an access token which you can use right away, as well as a refresh token, which should be saved. The refresh token can later be used on the Refresh Token tab to obtain a new access token once the current one expires. Access tokens usually expire in an hour (3600 seconds).
An access token is a long string that look something like this:
and a refresh token like this:
To obtain your access token programmatically, use AspEmail.NET's method GetAccessToken. This method expects the following input arguments: the service name (currently, only "GMAIL" is supported), the authorization code or refresh token, and a Boolean flag indicating whether the 2nd argument is an authorization code (if set to False) or a refresh token (if set to True). The method returns a new instance of the MailSender object with the property Username set to the access token, Password to the refresh token (if applicable), and Timeout to the expiration time in seconds.
For example:
MailSender Mail2 = Mail.GetAccessToken("GMAIL", "4/wQGBh....sM", false);
string AccessToken = Mail2.Username;
string RefreshToken = Mail2.Password;
int ExpiresIn = Mail2.Timeout;
The following script obtains a new access token from the refresh token obtained via the previous script:
MailSender Mail2 = Mail.GetAccessToken("GMAIL", "1//0dtD...1Kc", true);
string AccessToken = Mail2.Username;
int ExpiresIn = Mail2.Timeout;
As of June 2022, Google has stopped supporting "less secure applications" and blocked the use of the SMTP protocol to applications with the sensitive scope (which is a set of permissions granted to the application by Google itself). For those applications to send email via GMAIL, they must now use Google API instead of the traditional SMTP protocol. When an API (such as Google API) is used, an application posts data via the HTTPS protocol to a particular URL (known as an endpoint) in JSON format, and receives a response from that URL also as a JSON string.
As of Version 5.6.0.5206, AspEmail.NET supports the API mode, under which the body of the message is POSTed to Google in a single large HTTPS post. To enable the API mode, the Mail.Host property must be set to "Google API". The access token is specified via the Mail.Password property. There is no need to specify the TLS, SSL or Port properties.
Google access tokens expire every hour and need to be renewed regularly. It is up to the application developer to implement a mechanism to renew the access token via the refresh token automatically when needed. The refresh token, current access token, and its expiration information can be stored in a file, system registry, database, or some other way. The following code sample uses an ASCII file by the name of token.txt located in the same folder as the script, to store the refresh token, access toke, and expiration date as three lines of text.
The file needs to be initialized with a refresh token obtained manually via the Access Token Center as shown in the previous section. The script looks for an access token and expiration information in the file. If not found, or if the current time exceeds the expiration time, the script obtains a new access token via the GetAccessToken method, and updates the file. The script then sends email with AspEmail.NET and uses the access token as the password:
// Read token.txt
string content = File.ReadAllText(Server.MapPath("token.txt"));
string [] lines = content.Split(new char[] {'\r', '\n'},
StringSplitOptions.RemoveEmptyEntries);
foreach( string line in lines)
{
if( line.IndexOf("//") != -1)
RefreshToken = line;
else if( line.IndexOf(".") != -1)
AccessToken = line;
else if( line.IndexOf(":") != -1 )
ExpDate = line;
}
if( RefreshToken == "" )
{
Response.Write( "Refresh token not found.");
Response.End();
}
if( ExpDate == "" )
ExpDate = "1/1/1900";
// Expiration info missing, or token expired? Get a new one.
if( DateTime.Now > DateTime.Parse(ExpDate) )
{
MailSender HelperObj = new MailSender();
MailSender TokenObj = HelperObj.GetAccessToken(
"gmail", RefreshToken, true);
AccessToken = TokenObj.Username;
ExpDate = DateTime.Now.AddSeconds(
TokenObj.Timeout / 86400).ToString();
File.WriteAllText(Server.MapPath("token.txt"),
RefreshToken+"\r\n"+AccessToken+"\r\n"+ExpDate+"\r\n");
}
// Send email via AspEmail. Use AccessToken as the password.
MailSender Mail = new MailSender();
Mail.Host = "Google API";
Mail.Username = " gmail address>";
Mail.Password = AccessToken;
Mail.From = Mail.Username;
Mail.AddAddress( "email@domain.com");
Mail.Subject = "Email subject";
Mail.Body = "Email body";
Mail.Send();
3.5.4 Microsoft Office365 Support
As of Version 5.6.0.5338, AspEmail.NET's oAuth support has been extended to Microsoft Office365. To obtain an access token when connecting to the smtp.office365.com host, click on the Sign in with Office 365 button below:

Once you have been authenticated, you will be redirected to the Smtp.Office365.com oAuth Center page displaying your access and refresh tokens which can be copied and used in your scripts as shown in the previous sections of this chapter. AspEmail.NET's Host property needs to be set to "smtp.office365.com", and the first argument to the GetAccessToken method to "Office365", as follows:
Mail.Host = "smtp.office365.com";
Mail.Port = 587;
Mail.TLS = true;
Mail.Username = "<username>";
Mail.Password = "[oauth]EwBYA+l3BAAUcDnR9grBJokeAH...hRxTmHaGXc9Ag==";
...
MailSender Mail2 = Mail.GetAccessToken("Office365", "M.C549_BAY.0...QBXRhQ$$", true);
string AccessToken = Mail2.Username;
...

